
Blueprinting a 1000hp 2JZGTE Motor

Owning a fourth generation Toyota Supra comes with its own ups and downs. Most owners find themselves between a rock and a hard place when it comes to modifications. Due to the extensive power potential of this platform, it becomes difficult to hold back and limit oneself to a few simple modifications. If you’ve ever owned one of these fabulous vehicles and answered someone’s horsepower question with “Oh, I make about 450 or so…”, I’m sure their response would be: “Why aren’t you making 1000!”.
So then the quest for more power begins, and before you know it, you end up reaching the limitations of this stout motor. Some folks blow their motor to pieces, others spin bearings, and yet others rebuild their motor right from the start. In my case, I was rather lucky. Having dynoed nearly 800 whp at 28 pounds of boost and nearly three years of constant abuse on an otherwise unopened motor, its time was due and catastrophe occurred.
It started with a sound, the all familiar knock sound one hears while revving the engine. After dozens of checks for the source, no apparent signs of damage were seen. Heck, she still ran fine on the road! I decided to tear her down and investigate. That was when I found six lovely bananas (Where is the violin!):

It happened one lovely afternoon when I decided to raise the boost to 34 Psi. I reckon she was near 850 whp, but that is only speculation. She pulled very hard, and I remember feeling a slight hesitation, but thought nothing of it. It was quite possible they were already bent from previous endeavours. It was time. Time to take on a new challenge and build it better, stronger and faster. Unfortunately, being hands on like myself has its drawbacks. I have issues with the outside world when it comes to my baby. Leaving her in the hands of mechanics sends shivers down my spine. It was time to face this rebuild myself.
Follow along as I build a motor from the ground up, hoping to prepare for a
marvelous 1000 whp beast!
Preparing For Surgery


Motor Teardown and Inspection (Coming soon…)
’93 hardtop supra turbo
Hello readers at MKIV.com I’m Mario and thought it’d be nice to share something about my own supra and how she has been evolved since my ownership.
I own an originally Red june-1993 supra SZ which was bought by me when first imported into the Netherlands back in august 2009.
Since my ownership the car has been undergoing a few major changes, for example the 2JZ-GE got exchanged for an 2JZ-GTE, also the 5-speed W58 got exchanged for an 6-speed V160 in combination with an A02B differential.
While the previously fitted 2JZ-GE was taken out of the engine compartment the supra was sent off to the paint shop to get the engine compartment resprayed.


Installation of my 4” HKS Titanium exhaust system, customized for more ground clearance.


BPU’d the 2JZ-GTE and upgraded the j-spec 2/1 pot configuration into the ‘’US-spec’’ brakes all round.
The system exhaust got upgraded to an 4’’ HKS Titanium.
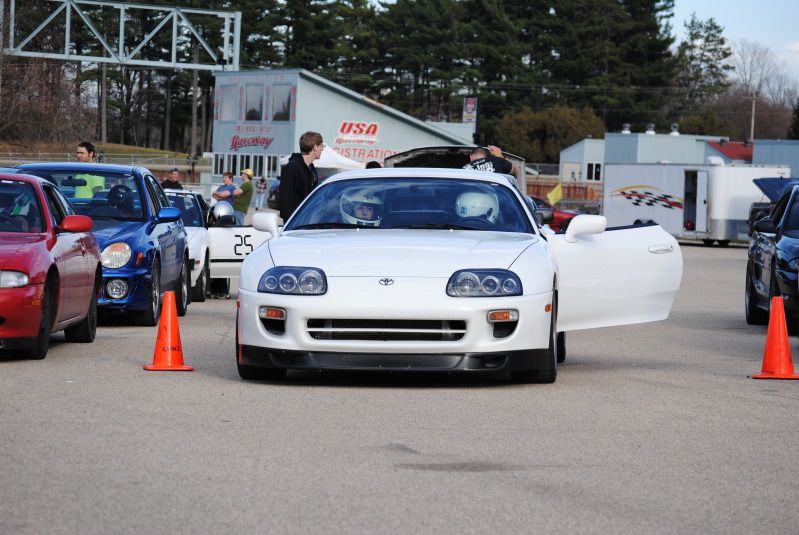
The supra is recently completely overhauled, the previous owner(s) resprayed the supra in a goldish, top-secret ish color with an aftermarket body kit. I wanted to get the supra back in her original shape with only OEM exterior parts. The supra received a full overhaul and is sprayed in Toyota’s 040 white, during the overhaul she received new window seals and installation materials as bolts, nuts, clips etc. Also she received OEM facelift lightening all round. Also new CCW wheels got fitted.
A few pictures of the restauration and how she sits at the minute, I will let the pictures do the talking.


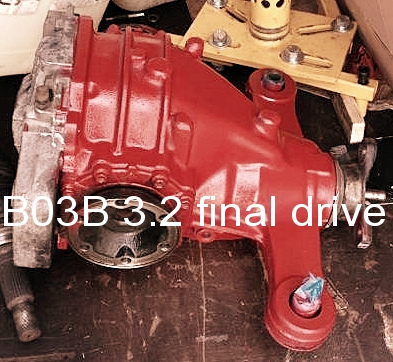
Exchanged the final drive from A02B>B03B this included the prop/ and driveshafts to be exchanged as well.
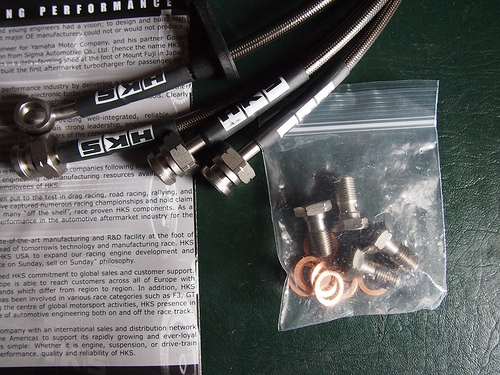
While at it the stock old brake lines got exchanged for the HKS braided lines,
Still lots of things in mind, will keep you updated.
Mario.
/p
3D Toyota Supra in High Detail

** DISCLAIMER ** The Toyota Supra’s design, its logo, and the Toyota logo belong to Toyota Motor Company. The following images are intended solely for entertainment and not for commercial purposes. I do not claim the rights nor origin of any of the copyrighted designs portrayed in the following images unless otherwise clearly stated.
3D Toyota Supra in High Detail
By Jay Xiong
A featured 3D Toyota Supra model? Why? There’s nothing particularly special about it. It has been done hundreds if not thousands of times by others for games, movies, fan art, etc. in various levels of quality and detail. So what makes this one stand out among the rest? Well, it’s all about what kind of Artist is behind such a project.
Hi, my name is Jay, and I had wanted an mkiv since the day I first laid eyes on one at a Connecticut highway gas station back in the spring of 2001; I was only 17. I then drew countless pictures of mkivs, collected almost all the scale models, and even saved as much money as I could in hopes of being able to afford my own someday. I saw all the movies with Supras (that I know of), watched all kinds of Supra vs.____ videos, often stayed aware on the road for possible Supra sightings, and I even made my own Supra comics. I talked about mkivs so much that “Supra” was practically my middle name. You see, this 3D Supra is different because it’s being modeled not by a regular Joe who simply likes mkivs but by an insane, lunatic Artist who has
worshipped mkiv Supras from day one.
So three years after discovering 3D Modeling, I dared myself to model the most detailed 3D mkiv Supra; I wanted to do this historic vehicle justice and help make it shine in the CG community since the majority of 3D Supras didn’t look quite right (go research it yourself). These artists had far greater potential but weren’t giving the Supra the level of attention it deserved. So I spent many nights up late and pulled numerous all-nighters, but modeling mostly around my busy schedule, it quickly became an every-now-and-then project, so what you see here has been in progress since 2009.
This 3D Supra was not made by commission nor for any sort of profit but made by an absolute fed-up maniac of an mkiv Supra fan (who is also now a proud 6-speed mkiv owner) purely for fun, and of course, just to say he did it. My hope is that you will appreciate (even if just a little) all the fine details I have crafted into this 3D model. I have used literally thousands of photo references (many of which were taken by myself) to ensure the model is as accurate as possible. With that in mind, however, capturing the exact dimensions & specs to the dot was not and is not the point (it’s impossible anyway, especially with polygon modeling). My goal is only to make it believable even to the trained eyes.
So pick it apart! Tell me the inaccuracies and problems you see, and I’ll make sure to fix up where needed. FEEDBACK PLEASE!! As of the date of this post, this model is about 90-95% completed as far as interior and exterior. The engine work as begun, and so far, it’s terribly brutal. From here on, it will mostly be engine updates. I cannot possibly know every single piece involved in the engine’s assembly (I’m a fan, not a mechanic), so your input would be greatly appreciated. So without further ado, enjoy this blog and its progress shots!
– Jay Xiong
Here it is… quite possibly the most detailed 3D Toyota Supra you’ve ever seen:

The following two were only meant for reflection testing and were not intended as final renders:


I love Advan T7s, so I might put these on for one of the final renders just for fun.


MKiV Twin Turbo Sequential System
One of the unique new features of the MKiV Supra was the Twin Turbo Sequential operation. Only a handful of cars touted this Sequential System. The system was designed to provide greater power levels at lower RPMs by diverting all the exhaust energies to the front #1 turbo. Since these turbo’s are rather small, running on one turbo provided a high spool characteristic. At or around 4000 rpms, the rear #2 turbo would kick in to provide for the peak potential power.
With this unique system comes complications. There are a lot of components that go into this system. If any of them malfunction, the entire system goes down. The “orchestration” of Actuators, Vacuum Switching Valves (VSVs), and vacuum lines via the ECU is a
real feat. As our beloved MKiV Supra ages, so does the Sequential System. Vacuum lines become brittle, actuators lose there ability to hold pressure, VSVs start to break down, Pressure tank loses it’s ability to store pressurized air. All of which is needed to have the system work.
Understanding this system can be somewhat complicated and difficult to diagnose. Several years ago I wrote a diagnostic manual to help people try to understand how it works and help find issues. http://97supraturbo.com/public_html/Seq%20FAQ/Seq%20FAQ.doc This doesn’t cover 100% of all possible issues, but it covers the most common. If anyone is serious to understanding and diagnosing the Sequential System, I highly recommend to purchase a MityVac hand pump. Like the MV8510 series. http://www.lincolnindustrial.com/asp/distributors/access/distributors/4_MV8510%20PIS.pdf. You will be able to test all the components with this. Find leaks, and actuator healthiness. As well as testing the pressure tank.
This all should aid you into figuring out issues. Your going to find that there is not many dealers/repair places out there that can understand and repair effectively, so the only person that can really get to it and fix things is YOU! Good Luck.
Stu Hagen
Introduction: Road Racing Supra’s

Hi, I am Dave Hanna and the proud owner of both a Mk3 (1992) and Mk4 (1997) Supra. Unlike the majority of Supra owners I find the best way to enjoy the cars is not the quarter mile but rather on race tracks and auto-x venues which involve braking, turning AND acceleration.


I purchased my first Supra, the mk3, in 2008 while I was in college. I bought the car with 82k miles on it and took it from its completely stock state to a mildly upgraded, 342 rwhp car, including a full motor re-build. For suspension It still uses the stock TEM’s shocks and springs with upgraded Whiteline adjustable sway bars front and rear. Wheels and tires are stock Mk4 wheels, wrapped in any of the Extreme Performance street tires popular in the Auto-x world (Dunlop Z1 Star Specs and Hankook RS-3’s for example) I did my first track day in 2009 and I was hooked. Ever since I have done many Auto-x events and the pace the car is quite good at the local events I attend.


In 2009 I graduated from College and began the search for my MK4. I have wanted to buy a mk4 for
at least ten years at the time, but took mine time to search for the perfect car at a price I could stomach. I ended up finding that car in June of 2011 and picked the car up in Albequerque New Mexico the day before I was to attend the Pikes Peak Hill Climb in Colorodo. It worked out perfectly. The car was a Stock Paint, all VIN tags present, Southern car all its life. It already had a few upgrades, including a Boostlogic T61 Single turbo conversion, HKS intercooler, Apexi GT-spec exhaust, Tein Type Flex Coilovers, Volk GT-N wheels, and maybe my favorite modification 13.5″ AP Racing Rotors and corresponding 6 piston Calipers up front. The car is now corner balanced and I have gone through and upgraded things for track time longevity since my purchase which I will elaborate on in a future post.

I will elaborate on the track day fun and experiences in both cars but can tell you without a doubt that if you try your Supra out at an HPDE style event you will likely be hooked!
Here is a link to my Youtube channel, there is plenty of on track Supra Content.
http://www.youtube.com/user/supradma71?feature=mhee
-Dave
MKIV EURO LIGHTS ELECTRONIC BEAM ADJUSTMENT
Purpose
– This mod will adjust your European Headlights Beam Height on the
Vertical Position.
Pros –
All 6 lights adjust up or down according to driver preference, used
in Europe extensively when increased weight is carried in the trunk of the
vehicle. In this case driver has the ability to adjust his beams
accordingly,
in order not to blind the coming vehicles. My purpose of using it, is
because I drive a lot at night, when traffic is limited to none, I can
adjust my lights a little bit higher than normal, so I can have a more
pleasant and less tiring trip (more light on the road).
Cons – I cannot think of something,
except abuse and either way, you (the
driver) can lower your beams in case you forgot them in an upper position,
since the coming drivers are going to notify you immediately (by flashing
the high beams).
Adjustment Capability
– The beams can move about 8 inches in height, when vehicle is facing a wall
at the distance of 6 feet. Significant adjustment
if one takes into consideration that on 100 feet distance the difference
can light up the trees if needed.
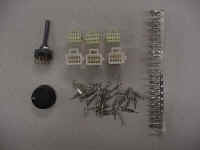
Needed tools and hardware
–
-
3 male connectors (6 – 10 pins)
-
18 male pins (make them 30, is
good to have some extras) -
3 female connectors (6 – 10 pins)
-
18 female pins (make them 30, is
good to have some extras) -
1 rotary switch (at least 4
position) -
Wires of the following colors:
RED, BLACK, WHITE, YELLOW, BLUE, GREEN. -
Length of each wire should be 14
feet and gauge 16-18. -
Harness protective sleeve 14 feet.
-
A decent looking knob, so it
doesn’t disturb the vehicle instrument panel harmony. -

– We are
fabricating the following schematic
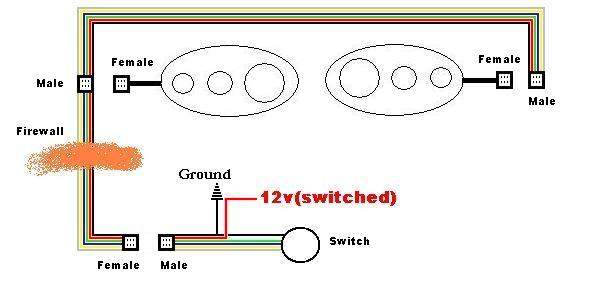
–
Install Photos


For power, we can use power from the
lighter, clock or any switched +12v. The circuit doesn’t have current while
resting on a certain position,
only when you change levels. The ideal is to
get power from the headlight switch relay, so your switch works only when
your headlights are on.
Serpentine Belt Drive Tension Damper System (Optional)
Serpentine Belt
Drive
Tension Damper System
(Optional)
– The 6-spd Supra TT use a
tension damper on the drive beltsystem, with each hard shift, the drive belt
tensioner spring vibrate, it get to the point were it will be bouncing back and
forth from the spring reaction under heavy load shifting, this tends to make the drive belt slip off the
accessories pulley’s, adding this tension damper system will damp the movement of the drive belt
tensioner.
Click Here for more information about the 6-spd
serpentine belt drive system & its related parts, from the 1993 NCF Book.
Click Here for more information about the Auto
serpentine belt drive system & its related parts from the 1993 NCF Book.
Here are the Parts numbers you
will need to get
Two 91511-G0845
Two 90179-08153
Two 90979-08171
Three 90116-08348
One 90901-16001
One 16622-46010
One 16621-46010
One 16602-46010
One 16620-46070
This what you will get,
top and lower brackets with hardware, tensioner & absorber.
Close up,
This is how it all looks put together,
Auto tensioner on the left, 6spd
tensioner on the right,
Here is everything installed,


Installation of the 6spd Differential, Drive Shaft & Left Axle
|
Here are the Parts numbers you |
|
1)
Here are diagrams and pictures of the parts you need to install, you will need
the differential, drive shaft and left axle.
– This is the 6spd differential,
when you order it from Toyota it will come assembled and ready to install, just
add oil (75w-90). if you buy it used then check its condition by removing the back
cover, or follow the manual instructions for testing.
– Here are some pictures comparing the 6spd rear with the auto
rear, notice the 6spd is longer front to back, also its left side is a littlie longer.
– This is the complete driveshaft, comes as two parts, front and
rear driveshaft, you will need both. if you buy it new, it will have to bought
together, Toyota does not sell them separately.
– Here is the Front driveshaft, the one on the left (short) is
for the Auto transmission, the one on the right (long) is for the 6spd
transmission, this is
due to the 6spd transmission being ~50mm shorter then the auto transmission.
– Here is the Rear driveshaft, the top one (longer) is for the
Auto tranny, the lower one (shorter) is for the 6spd tranny, this is due to the
6spd differential being longer then the auto differential (front to back).
– This is the Left axle, you will only need the left
6spd axle, due
to the 6spd differential being a littlie longer on the left side, the axle had to be
shortened littlie by Toyota, that’s why we only need the left axle in this
swap. Here is a table showing axle measurements from the 1995 Toyota repair
manual ,
TWIN TURBO, 6SPD TWIN TURBO, AUTO & ALL NA’s RIGHT AXLE 598.50
mm598.50
mmLEFT AXLE 547.50
mm553.50
mm


2) Here are
scans from the Toyota repair manual, scans for the replacing the differential,
drive shaft & axle.
– Differential,
– Drive Shaft
– Axle,


3) Here are
some pics of my own install,


Installation of the 6spd Sub-Tunnel
– Before we install the 6spd transmission
we will need to replace the auto sub-tunnel with the 6spd sub-tunnel, the 6spd
transmission sits few inches higher, the 6spd sub-tunnel will clear the tranny.
– Here is a Diagram from the toyota body
repair manual showing the differences in both sub tunnels. Notice how the auto
sub tunnel is flat, and how the 6spd sub tunnel rises few inches.


– You will need the following parts from
Toyota, shown
in this diagram in a circle,


– You will also need the top square marked part shown
in this diagram,


– Start by removing the driver seat,
e-brake, center console parts, radio and the auto shifter, you want to clear as
many parts as possible.
– Remove the ABS sensor from above the
auto sub-tunnel and modify it as shown in these pictures so it can fit the 6spd
sub-tunnel.


– Next remove the bracket holding the
e-brake, this will clear the area for the new 6spd sub-tunnel it fit in easier,
if you remove the carpet you will notice the spot welds, you basically need to
get a drill bit that is bigger then the spot welds, find all the spots and drill
them.

– Now almost all the welds are gone, but
the parts is still holding in, get under the car and start removing the rubber
holding the bracket in, Also you will need to work the top of the bracket to
brake it off or cut it with a Dremel,


– This is how it should look when your
done…


– Now you will cut the sub-tunnel, you
will need a jigsaw, notice from the top of the auto sub-tunnel how the outline
is easily shown, it extends all the way to under the radio, so make sure to
clear all the wires before cutting, you will need to use your drill to make a starting point
for your jigsaw, I started from the top tell I get close to the dash, then I
finished the rest from under the car.


– This how it should look after your done
with the cutting,


– You need to modify the 6spd sub-tunnel,
why? The 6spd sub-tunnel is a unversal part that fit left and right hand drive
supras, basically it have two threads on each side for the e-brake, cut the side
you don’t need (that’s the passenger side that need to be cut), this part will
fit better and easier with this modification,

– This is how it should look after its
been cut


– Here are the parts I cut off,

– Now test fit the new 6spd sub-tunnel,
insert it from under the car and upwards, make sure it have a good fit, do any
modification to achieve that, you want it to fit in snugly, Also you want the 2
e-brake threads to align with the e-brake, I had to use my Dremel to widen the
holes to get the screws to reach the sub-tunnel threads.

– After you test for the sub-tunnel
fitment and test the e-brake fitment, leave the e-brake screws holding on, we
will add more screw to hold in the new sub-tunnel, I added a screw to the front
of the tunnel as shown in these pictures,


– And another screw in the back, There is
a centering hole built in the new sub-tunnel and the body of the car, try to
line them up, lining this screw and the e-brake tells you you have a good
fitment, see these pictures,


– And another screw on the passenger side,
add as many screw tell you get he sub-tunnel it fit in nicely,

– There is a bracket that bolts between
the dash and the sub-tunnel, while your adding screws to the new sub-tunnel and
checking fitment, try to get this bracket to also align up, in my case I had to add
nuts under the bracket to make it high enough to reach the dash, see this
pictures,

– Once your happy with the fitment of the
new sub-tunnel, remove all the parts, visit your home improvement store and
buy ‘Liquid Nails, Heavy Duty’ Adhesive, we will use this to seal & glue the new
sub-panel to the body, this will reduce noise, keeps the dirt out and give some
strength to the two parts that have to come together, it takes up to a week for
this stuff to become totally hard, so don’t worry about it, just give it time,
it works well!

– Cover the 6spd sub-tunnel with the
Liquid Nails Heavy Duty, be generous with it, you will for sure finish one
bottle of this stuff, now insert the sub-tunnel from under the car and screw it
with the e-brake screws and the other new screw points, see these pictures,


– I used some of the Liquid Nails Heavy
Duty to seal all the gaps from the bottom as shown here,


– Your Almost Done! this how it should
look as soon as you put in the 6spd tranny,


