Author Archives: admin


Lifting the Supra
– You will need to
raise the car about 2
feet in the air to give yourself room to work comfortably.– Best to use (x4) 6 Ton jacks, they can
support the car weight easily, and support it to the desired height. About
$30 for two.– You will need some sort of wooden Blocks
to help the hydraulic jack to raise your supra to the desired height.
– I decided to put the front jacks under
the engine support, instead of the side frame, that gave me more flexibility to
work around the transmission area.


– I used smaller jacks in the back (I
didn’t have another set of the 6ton jack), they worked, but the transmission did
not exactly clear the body of the car, with some effort I was able to clear it.
I still recommend the (x4) 6ton jacks instead.

– it will get messy, so make sure to get
enough room around your car, I used a two car garage.
– You will need all the basic and non
basic tools, look through my install page & your
Toyota repair manual
and notice what tools you need to complete this project.– I recommend a transmission jack if
available, Comes handy.

![]()
Clutch Pedal, Brake Pedal and other in Cabin Options
Clutch Pedal,
Brake Pedal and other in Cabin Options
1)
Here are diagrams of the parts you need to install the clutch & brake hydraulics
inside the cabin.
– You will need everything in
this diagram, it comes in a kit as one part, you will also need to get the 2 nut
as shown.
– You will need nearly everything
in this diagram, there are two switches shown, one switch is used to start the
car when the clutch pedal is pushed, I skipped that switch, cost wasn’t
attractive at $30, if you feel that you need it then that’s up to you. Also there is
a second switch which is used to disengage the cruise control system when
activated, I decided I will install it, cost was only $12, plus it will come
handy. Make sure to use grease to lubricate the contact points of the
2 springs before the install.
– From this diagram you will only
need two parts, the 6spdbrake pedal and its rubber pad, you will notice the new
pedal is also missing a small rubber that installed on the pedal top, simply
remove it from the old pedal and install it into the new pedal.


2)
Lets start removing the parts to make the work easier.
A) Remove the driver seat, remove
all the parts under the steering wheel, you will need to get everything out of
the way to get a clear view of the work area, plus you need your tools to be
able to work in that area without restrictions.B) Look in the top left corner
from under the dash, you will notice a pad that been cut out, remove it, you
will see behind it 3 holes that are marked, cut these holes to the sizes marked
in the metal, I used my biggest drill bit to drill the two small holes to size,
then used a round cutter to cut the center big hole, then I used a Dermal to
widen it to the correct size, it should look like this when done.
C) Test the clutch master fitment,
D) Now install the clutch pedal
assembly, I found it neccessary in my case to use a razor blade to cut some of
the padding as shown in this pic, it might not be neccessary in your case.
Install the clutch pedal assembly and
secure it with the clutch master 2 nuts, also install the top screw hidden
under the dash (look for it), once done plug in the switches harness, you will
find a two wire white harness near each switch, simply plug it in. if you decided
you don’t want the clutch starting switch then you will need to join the two
wires together, I used a 2 wire joining clip sold at NAPA and others.
You will notice a 4th hole that
we did not drill for, this is done last, once you secure everything, use the
hole in the clutch pedal assembly as a guide to drill for this last hole, Toyota somehow
don’t list the hardware used for this part, simply buy a matching screw, nut
and washer to fit the hole, you will need to remove the front left tire and the
plastic cover surrounding it to reach that hole that you just drilled to install
the screw and nut.


3)
Now lets install the brake pedal, this is an easy swap, simply remove the auto
brake pedal, move its hardware to the 6spd brake pedal, put it back together.


4)
(Optional) The auto & 6spd gas pedals are different, you will be able to use the
auto pedal just fine, unless you really want it to be a true 6spd :-).

Auto

6spd
5)
(Optional) The gas pedal in the auto got a kick down switch as shown in this
photo, this is unfound on the 6spd, its up to you to replace it with the 6spd
gas pedal stopper.
on the left is the 6spd plastic gas pedal
stopper, on the right the auto kick down switch.


****When
your done with all the pedal work, it should look like these pictures,

6) Once the
6spd swap project is done, you will need to get the 6spd shifter center console,
shown in the upper circle of this diagram, there is also an optional support
bracket shown in the lower circle.
Here is a picture of that bracket on
another 6spd supra.


7)
(Optional) its up to you to replace the tachometer (RPM), Notice the auto
tachometer got extra lights on it (O/D, P, R, N, D, 1, 2 etc..), you will need
to replace the auto tachometer with the 6spd tachometer. This is just for
‘looks’ purpose, the auto tachometer works fine if you still want to use it.


8) (Optional)
6spd ecu, your supra will run fine on the auto ecu, but I do recommend the 6spd
ecu, it will control your engine better,
ignition timing and other engine functions will be tunned to your 6spd
transmission. The auto ecu is known to pull timing at shift points.


WOW. Low-mile Supra Turbo on eBay.
There is a 1997 Supra Turbo on eBay with 11,000 original miles.
Appears to be bone stock with no modifications.
It is a White on Black, 1997, 6 Speed car.
It is becoming increasingly difficult to find a Twin Turbo Supra with low miles
and in stock condition.
This car SHOULD sell for over $50,000.
DISCLAIMER: I have no affiliation with the car, or the owner.
I
haven’t seen the car. Of course, buy at your own risk.
I’m eager to see what this Supra sells for.


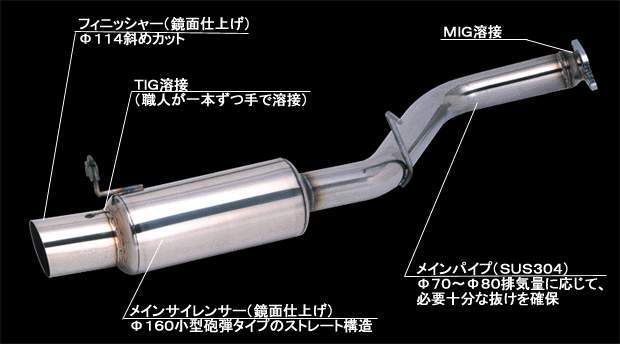
![exhaust_b[1].jpg (51747 bytes)](exhaust_b%5B1%5D.jpg)
![exhaust_u[1].jpg (59552 bytes)](exhaust_u%5B1%5D.jpg)
![my_car[1].jpg (60302 bytes)](my_car%5B1%5D.jpg)
![TRD%20exhaust[1].jpg (39255 bytes)](TRD%2520exhaust%5B1%5D.jpg)
![trd%20tip[1].jpg (35232 bytes)](trd%2520tip%5B1%5D.jpg)
![car%20trd%20rear[1].jpg (44999 bytes)](car%2520trd%2520rear%5B1%5D.jpg)
![compare1[1].jpg (32881 bytes)](compare1%5B1%5D.jpg)