Blitz
DSBC Installation

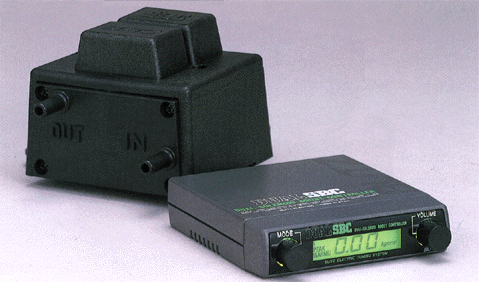 

- Purpose: allows the turbo boost to be set to a consistent level (actually, 4 preset
levels) and eliminate boost spikes. This modification cured a pre-ignition (detonation)
problem in my car due to boost spikes when using a bleeder T to increase boost.
Tools/parts required: (4) 1/4" vacuum caps, scissors, flat-head screwdriver,
coat hanger, duct tape, flash light
Time
required: 2-3 hours
-
- Control Unit Installation:
- Choose a place to mount the control unit. To mount the unit on
top of the steering column like I did:
- Run the long harness with the power/ground plug behind the dash
between the gap in the dash just above the steering column. You'll have to lay on your
back with you head near the gas pedal to do this. Shine a light from the front of the dash
so you can locate where to route the wire. Pull the wire thru the gap, then, from the the
front of the dash, plug into the DSBC control unit.
-
- Extend the length of the 1/8" diameter hose coming out of
the back of the control unit using the supplied connector and extra hose. Shove the hose
and the two connectors into the gap so it looks tidy as in figure 1.
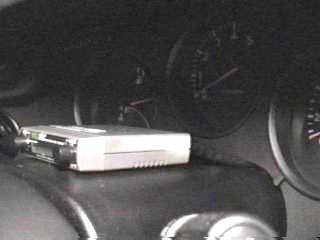
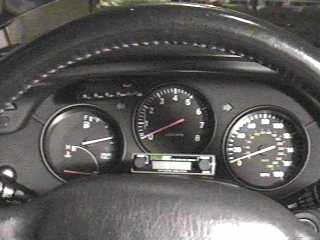
fig. 1
-
- Connect the hose coming out of the control unit into a boost
source. I tapped into my boost gauge hose, behind the dash as shown in figure 2. Use the
supplied hose clamps on the T as shown.
-
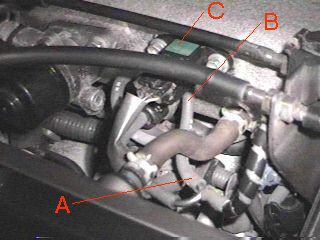
- If you don't have a boost gauge, you can tap off the metal Y
going to the turbo pressure sensor ('A' in this picture), but you'll have to run the hose
thru the firewall into the engine compartment,
- (see the boost gauge install page).
-
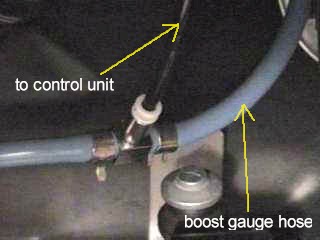
fig. 2
Connect the black ground wire. I connected it to a 10mm bolt
that goes into the firewall near the clutch (fig 3).
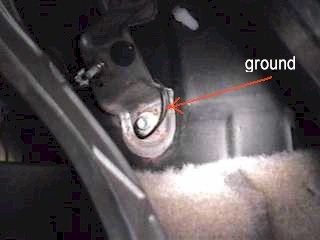
fig. 3
-
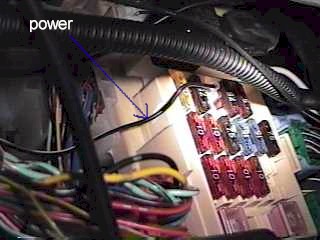
Connect the red power wire. I connected it to a terminal spade
and then plugged it into the unused "SEAT HTR" fuse position (the third one from
the front, top, row of fuses) as in figure 4. Note, for my install only, that the wire
shown is black with a white stripe (this is where my radar detector is wired to,
I just tapped into this wire).
- fig. 4
-
- Solenoid Installation
- Route the long wiring harness thru the firewall:
- a) punch a hole thru the yellow rubber
grommet near clutch pedal with screwdriver (fig 5)
- b) duct tape the end of the harness to a coat
hanger
c) route wiring harness thru this hole into engine compartment, push as
far and as high as possible
- d) from under the hood, pull the harness into
the engine compartment (near the brake master cylinder, not shown)
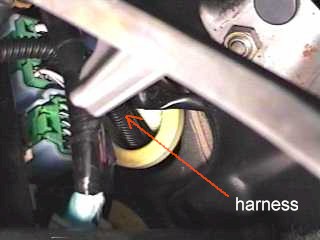
fig. 5
-
- Route the harness along the firewall, ending up near the
passenger-side shock tower (not shown).
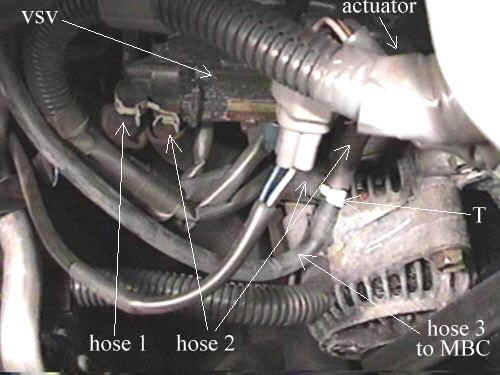
- Disconnect and remove the two hoses from the black wastegate VSV
(just above the alternator), then cap (1 & 2 in fig. 6).
- Click Here for a
picture of what the VSV looks like before the vacuum caps were added (ignore white bleeder
T).
- Disconnect and remove the hose from the
bottom of the
brass wastegate actuator, then cap (3 in fig. 6).

fig. 6
- Disconnect the hose that runs from the left side of the
wastegate VSV (1 in fig 6) up to the metal tube, then cap (1 in fig. 7).
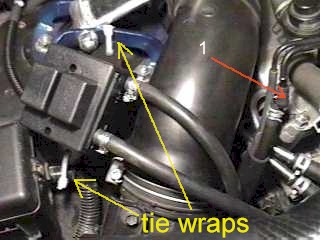
fig. 7
- Disconnect the hose from the top of the wastegate
actuator (not shown, but the actuator is shown in fig. 6). The other end of this hose goes
to the #1 turbo pressure outlet - remove this hose.
- Mount the solenoid near the passenger-side shock tower with
tie-wraps (fig. 7).
- Connect one of the supplied 1/4" diameter hoses from the
turbo pressure outlet on the #1 turbo to the IN side of the solenoid valve unit (not
shown).
-
- Connect the other supplied 1/4" hose from the OUT side of the solenoid valve unit to
the top of the wastegate actuator (not shown).
-
- Note: cut
the two hoses that connect to the solenoid unit to the shortest length possible. The DSBC
manual states that boost spikes can occur if these hoses are more than 3 feet long.
-
- Obviously, make sure all wires and hoses
are free from moving engine parts and not in direct contact with anything
hot.
Tuning:
- Set the gain to 5 by turning the MODE knob until
1234M is displayed. Hold the MODE knob until 1234M blinks, then dial the VOLUME knob to 5.
Press the MODE knob to lock in the setting.
- Note that I inadvertently set the gain to
60 one time and this caused pre-ignition (detonation) in my car because the boost was
coming on too quickly.
-
- You have four preset boost levels you can
program (plus stock boost level when the unit is set to OFF).
- To program each boost level, turn the MODE
knob until the desired boost preset (1 to 4) is displayed. Hold the MODE knob until the
preset (1-4) blinks. Rotate the VOLUME knob to the desired boost level (0-100). Note that
this represents a ratio (0=stock boost, 100=maximum boost possible). Here is how I
configured the presets:
Preset |
Volume |
Approx.
psi* |
off |
0 |
13 |
1 |
54 |
16 |
2 |
58 |
17 |
3 |
63 |
18 |
4 |
75 |
20 |
*The unit displays boost in kg/square
cm, not in psi; boost level depends on mods and the weather, my car is
BPU. The car will make more boost in higher gears.
Pressing the VOLUME knob changes between
current boost setting, boost gauge, and peak hold (press MODE to reset
peak hold).
I recommend you set the boost limiter to
prevent running too much boost:
- Turn the MODE knob until you the
display turns red and the WARN icon is blinking.
- Turn the VOLUME knob to set the
desired limit level. I set mine to allow max boost of 1.20kg/square cm
(17 psi). When the boost limit is reached, the unit will beep and
boost will be reduced according to the next setting:
- Push the VOLUME knob to display the
amount (in percentage) to reduce the boost when the limit is reached.
Note: pushing the VOLUME knob toggles the display between the limit
level and the reduction amount.
- Turn the VOLUME knob to set the
desired amount (0 means limiter the limiter is disabled). For example,
mine is set to -6 which means the current boost setting will be
reduced by 6 percent when the boost limit is reached. The original
boost setting will resume if the current boost reading falls below the
limit amount.
The unit also has a "scramble
boost" feature that lets you run a certain boost level for a specific
amount of time. I did not enable this this, as I found no use for it.
Need
the original instructions in English?
Call Blitz USA at
714-777-9766.
Check
out this very nice description of the DSBC (with tuning help) at:
www.geocities.com/MotorCity/Speedway/9589/dsbc_manual.html
Comments/suggestions? Email me

|